Showing posts with label projects. Show all posts

Wednesday, September 4, 2013

Backyard Tire Swing

When life gives you lemons, make lemonade!

2013-07-14
In our case, when life gives you a flat tire, use an old tire to make a tire swing!

On our way home from Iowa in July, we ended up with a flat tire on our camper. Luckily we had a full-size spare and we had no trouble changing the tire.  (This is one of those times where “we” means handy hubby).

After buying a new set of camper tires, hubby kept one of the old tires (saved the $3 recycling fee!) and picked up a rope and carabineers to make a tire swing in the backyard.  The best part?  We can unhook the tire swing and hang up a disc swing in about 20 seconds. 

Putting together a backyard swing is really pretty simple!  The funniest part was when hubby tied the rope to a hammer and threw the hammer up and over the branch.  Except the hammer didn’t go over the branch.  It got stuck.  It took some finagling, but he worked it out and even saved his hammer!  The branch is WAY up there, so it was a bit tricky!

Can you tell what Anthony thinks of his new swing?

2013-08-04 (17)e
2013-08-04 (19)e
2013-08-04 (49)e
2013-08-04 (72)e
2013-08-04 (84)e
2013-08-04 (88)e
Did you notice that single crooked tooth? Of course you did. How could you not?  His smile is one million times cuter without that tooth!

This swing is used almost daily!  He loves it!


Monday, August 5, 2013

Handmade Chevron Quilt

Chevron Quilt by MomsGonnaSnap
I have been wanting to update Anthony’s room and make it more colorful for awhile – he was almost 7 when we started this project and still had a room full of trucks, trains and planes.  He likes “zig zags”, so I convinced my mom to help me make him a chevron quilt for his new room (he also switched bedrooms).  If you know me, you know I am not really into sewing, and I definitely do not enjoy it. That said, I love a good project and seeing progress happen, and making this quilt definitely met my desire for a “quick project”.  My mom might not agree on the “quick” part, but more on that later…

My Mom drove over from Wisconsin and we met at my house.  First we had to spend some time working through the math to figure out a pattern.  This was tricky, but we figured it out!  We headed out fabric shopping around 1:30 and eventually came home with this pile of fabric.  I have to admit, I was SHOCKED at how expensive the fabric was.  Seriously – crazy expensive!!

2013-05-29
After dinner we dove in and started working. It took a little time, but eventually my mom trusted me to measure and cut the fabric. We used a method like this to make the squares and then just set them out on the floor to create the strips.  I measured, cut, did some ironing, and most of the pinning, while my mom was the lady at the sewing machine making the real magic happen.

2013-05-29
Here are all the rows laid out on the floor in our living room – this was about 24 hours after we headed out to buy the fabric!

2013-05-30 (3)
We finished the quilt top around 5:00 the next afternoon (less than 24 hours after we starting cutting the fabric!). After we had the top all sewn together, we laid it out on Anthony’s new bed and this guy quickly climbed on top of it.  (check out that outfit – crazy swim trunks are all day attire! Ha!)

2013-05-30
Then came the easy part (at least for me!).  My mom took the quilt top home with her, picked up some batting, and finished assembling and sewing the quilt. It sounds so easy, right?  I do know that she spent many long hours working on this (and Anthony and I are very thankful for her work!).  She tells me that this was a HUGE quilt to maneuver through her machine. So big that she had to move her machine from her sewing room out to the dining room table so that she had enough room. The quilt is also so heavy that she had to help “hold” the quilt by rolling it and throwing it up over her shoulder. It looks a little warm too (she did this in June)…

2013-06-12
Here’s a few pics of the finished quilt, just because you need to see it in all it’s glory! 

2013-08-01 (3)e
The gray fabric is a little funky and I LOVE all of the other bright colors!

2013-08-01 (5)e

2013-08-01 (14)e

2013-08-01 (6)e
Now if only the rest of Anthony’s room would get finished up as “quickly” as this quilt did!  Thanks Mom!


Linking to: Sugar Bee Crafts, Uncommon Designs, Life With the Crust Cut Off, Skip to my Lou, Ladybug Blessings, Made to be a Momma, Ginger Snap Crafts, The 36th Avenue

Monday, July 15, 2013

Carpet! {Basement Update}

It’s been awhile since I have posted an update on how things are going in the basement.  We have continued to work on things, and wow, have we come a long way from where we started.  Here's where we last left off.

It look a ton of discussion, but we finally made a decision about the railing for the stairway. Should it be white? Should it be stained? Should it be a combo of white and stained? If it’s a combo, which parts are stained, and which parts are white? Seriously, some decisions end up so much harder than they need to be. This one definitely took some thought.

We decided to do a combo of painted white and stained wood to help with the transition from the stained doors/trim upstairs, to the white trim downstairs.Here’s what we decided for the railing:

2013-06-11 (5)
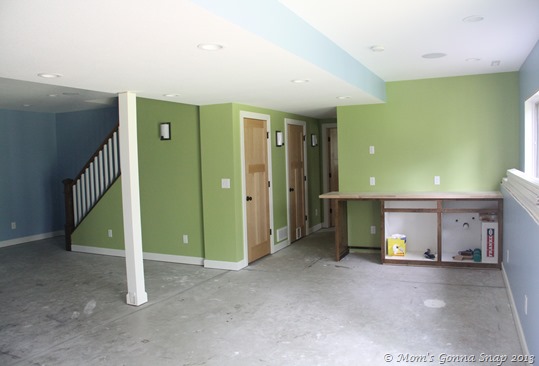
Here we are ready for carpet! The top on the wet bar is not the top that will stay there.  That piece will actually be going on the half-wall on the right (where the extra trim is stacked).  It will be cut and stained dark like the tops on the built-in cabinets. We haven’t decided what the countertop surface on the wet bar will be yet.
2013-06-11 (18)
Here’s the spare room. You can see the wood tops on the half-walls – this will carry through the bathroom, and the family room.  We still need to trim out the windows.  They were not a necessity for carpet, which was our recent goal.  At this point the focus is on what HAS to be done to pass inspection.

2013-06-11 (26)
Here’s the family room, just waiting for carpet.  You can tell that we have been using the basement as our “finishing room” for years.  There are strange stains all over the concrete from spray paint (over spray), stain drips/spills, paint, etc.  The cabinets are still waiting for doors, shelves and crown molding. My priorities are not at the top of hubby’s list… Ha.

2013-06-11 (32)
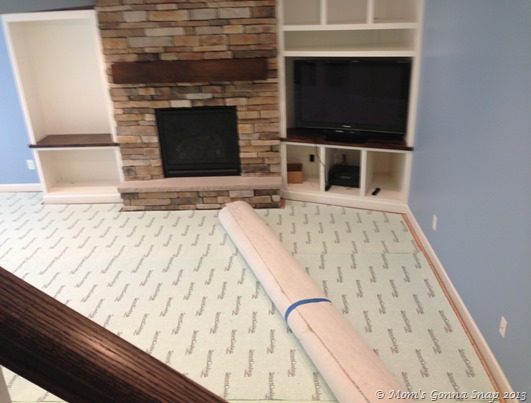
The fireplace is my favorite thing about our basement.  I can’t wait until we have furniture to snuggle in on and enjoy a cozy fire this fall!

2013-06-11 (38)
Install day!  We snuck down and took a couple of pics during the carpet install.  It was so hard to wait all day!
2013-06-11

2013-06-11

The carpet is in!!!

2013-06-11 (57)

2013-06-11 (60)

2013-06-11 (61)

2013-06-11 (68)

The carpet has been in for one month, and since then we have been busy moving some furniture around.  We can FINALLY bring some things back into the basement to STAY.  It’s been 1.5 years since that has been an option.

It feels like we are close to being done, but there are still so many things to do…  Maybe we’ll be done by Christmas?  Just one year past my original goal??  We’ll see.


Sunday, June 9, 2013

Biking 100 Miles! {Fun for kids}

Summer of Biking 100 Miles by MomsGonnaSnap
This past week I met a friend for dinner and we were talking about things we planned to do with our kids this summer.  She set a goal with her boys to ride 100 miles on their bikes this summer, which is a great goal!  She had found some great ideas of tracking the miles (on Pinterest, of course!), and planned to created a chart with her boys.

I thought it sounded fun, so I mentioned the idea to Anthony, and he was NOT interested.  Over the past couple days we have been going on lots of bike rides and tracking our miles for fun, and he has now decided it’s a good idea!  I have to admit, I was pretty excited that he was so interested!

This afternoon I quickly created a table in MS Word and then set Anthony down at my computer to fill in the 100’s chart (just like he did in 1st grade).  He had to add his own special note at the bottom, too.  He cracks me up!

Summer of 100 Miles by MomsGonnaSnap
Interested in a free copy (without my son’s notes on the bottom)?  Just shoot me an email at MomsGonnaSnapBlog@gmail.com and I will gladly email it to you! 


Wednesday, May 22, 2013

Cub Scouts Pinewood Derby

Anthony’s Cub Scout graduation was Mother's Day weekend and I’m finally going through pictures of the Pinewood Derby (from February!).  Better late than never, right?? 

Pinewood Derby by MomsGonnaSnap
The kids (and their parents) made great Pinewood Derby cars, huh??  The cars were equally impressive last year too.

Anthony’s car is the Batmobile.  He made the car with hubby and I helped out with the logo. They built the car pretty quickly, found the cockpit at Hobby Lobby and glued his Lego Batman inside.  I used my Silhouette to cut out the Batman logo and set Anthony up to paint. He did great!  More info about the Batmobile here.

2013-02-10 (6)e
They set up a big track and the boys get to set their cars up on the track for each race.

2013-02-10 (31)e
Here are the 4 cars for the Tiger Cubs (1st graders) -

2013-02-10 (35)e
One of the boys gets to stay at the start and push the button to release the cars.  They love it! 

2013-02-10 (39)e
Here’s Anthony waiting for his car to come.  His car placed 3rd place in the Tiger Cubs.

2013-02-10 (56)e
Each year they ask a handful of people to vote for different awards for the cars. The kids names are hidden and their cars are numbered for the voting. The awards include Most Wood Removed, Least Wood Removed, Scout Colors, People’s Choice, etc.  Anthony’s car won the People’s Choice award – he was so excited!

2013-02-10 (86)e
Another successful Pinewood Derby in the books! 


Thursday, April 25, 2013

My First Attempt… {Digital Scrapbooking}

The last couple weeks have been busy!  I have been working way more than half-time, hubby was traveling and day-to-day life just took over.  I’m not done posting about our trip to Florida (I have several more parks to write about!), I just ended up a little side-tracked.  Still focused on Disney though!

I have a friend who creates digital scrapbooking products and I have been curious about it for years.  She recently collaborated with another digital designer and created an entire series of digital scrapbooking products that they have called Project Mouse.  I couldn’t resist – I decided now was as good a time as ever, so I downloaded their freebies and purchased a few of their designs.  I also purchased a couple Project Life digital templates to get started.

Here’s my 1st ever digital scrapbook page! 

Disney 2013 v2
I'm definitely a rookie with Photoshop, but this was SO much easier than I thought it would be!  The best part?  No mess!  I worked on this while snuggled in on the couch with Anthony at my side.  Perfect!


Thursday, April 4, 2013

The Fireplace is Finished! {Basement Progress}

I have been sorting through pictures from our vacation every night this week (and I'm loving every minute of it!). While sorting through pictures, I realized that I haven't posted an updated photo of the fireplace stone now that it's finished. The last update on the progress in the basement was also related to the fireplace.

There are many skills that we have learned while working on the basement, and learning how to install fireplace stone has definitely been one of the trickiest.  It took some trial and error, and a few stones falling off (yes, falling off...) for us to figure out how to move forward with the stone.  A couple of tricks that we learned were to use more water in the mortar, spray the back of the stone, and spray the wall. 

Here is hubby putting on the scratch coat.  At this point I was pretty convinced that this was not a project we should be attempting to tackle.

2013-03-02 (4)
He did the scratch coat on a Saturday morning, we started with the stone late afternoon on Sunday and finished the stone approx Thursday night that week.  We still had to grout, but we were pleased to have the stone up in less than a week. The photo below is after 2-3 different evenings of installing stone.  I joked that I was moon-lighting as a stone mason that week...  In a couple of these photos you can see the stone on the floor in the bottom of the picture.  I spent some quality time laying out the stone for the entire fireplace wall on the floor so it could be quickly and easily transferred to the wall. Since we mixed two different colors of stone, this was definitely necessary to make sure the color was balanced.  It also helped to make sure the joints of the stones did not line up (we wanted a staggered look).

Fireplace Stone - MomsGonnaSnap
Right before leaving on our trip for Disney we finished the fireplace by grouting. We didn't grout between every stone, just filled in the gaps using a grout bag.  Two days before leaving for Florida we had the fireplace company return to complete the set-up of the fireplace – it works!

Fireplace By MomsGonnaSnap
You can read more about the fireplace install here.

The best thing about this fireplace? It kicks off some serious heat, which is important in Minnesota!  In the end, we are pretty proud of our work!

Linking to: Thrifty Decor Chick, house by hoff, Remodelaholic

Friday, March 8, 2013

Fireplace Stone {Basement Progress}

This past week has been a full week – nearly every evening we have been working in the basement on the fireplace stone.

Here’s a quick iPhone photo to show the progress we have made!

Fireplace Stone - MomsGonnaSnap

The stone will go all the way to the ceiling – we are hoping we can get the rest of the stone installed this weekend!

Happy Friday!

Monday, February 4, 2013

Cub Scouts Pinewood Derby {Batmobile}

This is our second year of the Pinewood Derby and Anthony is much more interested and prepared this year.  Click here to see his car from last year.  Initially his design for this year was modeled after a Lego Ninjago car, but once he had the idea of making the Batmobile, he was sold!  No turning back!

Pinewood Derby - Batmobile by MomsGonnaSnap
Yes, that’s a Lego Batman glued inside!

Pinewood Derby - Batmobile by MomsGonnaSnap (1)
Here they are ready to paint the logo on. Handy hubby is showing Anthony where to paint – if you look closely you can see the Batman logo in vinyl (thanks to my Silhouette).

Pinewood Derby - Batmobile by MomsGonnaSnap (2)
Not the best photo (hubby’s iPhone pics), but I had to document the little painter at work!

Pinewood Derby - Batmobile by MomsGonnaSnap (3)
Anthony was worried that he was putting too much yellow paint on and that we wouldn’t be able to see the bat.  He was THRILLED when we peeled the vinyl off!

Pinewood Derby - Batmobile by MomsGonnaSnap (4)
They decided to put the weights on like body armor.  Tomorrow night they are headed back to the post office near our home to weigh the car one last time – hoping to get it all set for this weekend since hubby will be at a basketball tournament while Anthony and I go to the Pinewood Derby (this has been their project, not mine!).

Pinewood Derby - Batmobile by MomsGonnaSnap (5)

Pinewood Derby - Batmobile by MomsGonnaSnap (7)
They did a great job!  The best part – Anthony says the important part of the Pinewood Derby is to just have fun.  He’s not even worried about winning!  Love him!

Click HERE to read more about the Pinewood Derby.

Tuesday, January 29, 2013

Built-in Cabinets {Basement Update}

It feels like so much progress has been made over the last few days that I just had to share what happened this evening!

Handy Hubby finished building the bookshelf cabinet yesterday! We carried it in tonight so it's now ready to prime and paint. Since it's in the basement, we just had to try it out and see how it fits. It will be painted white, there will be trim at the top, shelves built, etc., but this is progress!  It's so awesome to see our vision coming together.

2013-01-29

2013-01-29

2013-01-29

All of the extra stained boards are pieces that will be around the basement on top of the 1/2 walls.  They will also be on the ledge going down the stairs to the basement.

Next up? The cabinet that will hold the TV on the other side!